
Shipping zones and shipping classes are the two primary tools in WooCommerce for configuring how shipping options are presented to customers at checkout. Together, they allow store owners to offer different shipping methods and rates based on where a customer is located and what type of product they’re ordering.
A shipping zone is a geographic area to which you ship — a country, a set of states, a group of postal codes, or a continent. Each zone contains one or more shipping methods (flat rate, free shipping, local pickup) with their associated costs. Customers see only the methods available for their shipping address — someone in California sees different options than someone in Germany if you’ve configured those zones differently.
A shipping class is a product-level label used to group items that share similar shipping characteristics — heavy items, oversized products, fragile goods, or digital downloads. Shipping classes allow you to apply different rates within the same shipping method based on product type. For example, a flat rate zone can charge $5.99 for standard items and $19.99 for items in the “oversized” shipping class.
[Image: Diagram showing two shipping zones (Domestic and International) each with different shipping methods, and a product catalog with items tagged with shipping classes (Standard, Heavy, Fragile)]
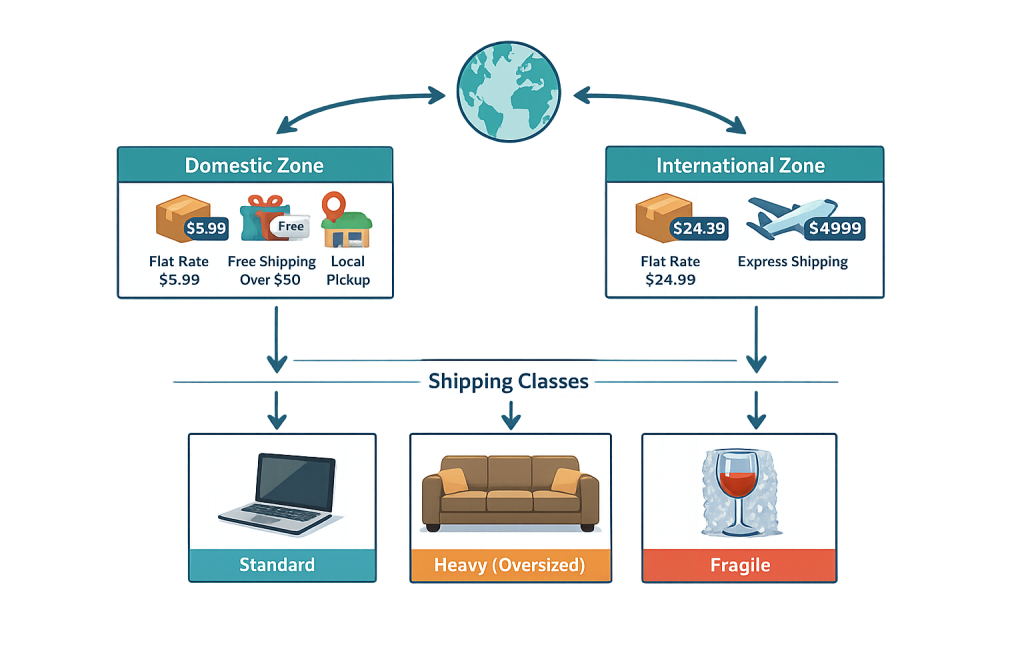
How Shipping Zones and Shipping Classes Work Together
The WooCommerce shipping system operates in layers:
- Customer enters a shipping address — WooCommerce matches the address to the first shipping zone it fits (zones are checked in priority order from top to bottom in your settings).
- Available shipping methods are displayed — Only the methods configured for the matching zone appear at checkout.
- Rates adjust based on cart contents — If products in the cart are assigned to shipping classes, the applicable class rates within the matched zone’s shipping method are applied.
For example: a store has a “United States” zone with a flat rate method that charges $6.99 standard, $14.99 for “heavy” class products, and $0.00 (free) for “digital” class products. A customer in Texas with a mix of standard and heavy items in their cart sees the appropriate blended rate at checkout.
Purpose & Benefits
1. Offer Accurate, Location-Appropriate Shipping Options
Shipping zones ensure that customers only see shipping options relevant to their location — free local pickup doesn’t appear for international orders, and domestic flat rates don’t apply overseas. This eliminates customer confusion and prevents incorrect shipping rates from being applied, which protects profit margins and avoids fulfillment disputes.
2. Accommodate Product-Level Shipping Cost Differences
Without shipping classes, every product in a zone shares the same shipping rate — which rarely reflects reality. A store selling both greeting cards and cast iron skillets can’t charge the same flat rate for both products. Shipping classes solve this by allowing rate differentiation within a single shipping method, giving stores the flexibility to price shipping accurately by product type.
3. Support Complex Shipping Structures Without Custom Code
WooCommerce’s built-in shipping zone and class system can handle most shipping configurations without custom development — international rates, regional variations, product weight tiers, free shipping thresholds, and mixed carts all work within the standard settings. This is central to building a checkout flow that reflects how a business actually ships.
Examples
1. Simple Domestic/International Zone Structure
A mid-sized WooCommerce store configures three zones: “Continental US” (flat rate: $8.99), “US — Alaska & Hawaii” (flat rate: $19.99), and “International” (flat rate: $35.00). A customer in Montana sees the $8.99 rate; a customer in Honolulu sees $19.99; a customer in Canada sees $35.00. No customer sees options they’re not eligible for.
2. Free Shipping With a Minimum Order Threshold
A home goods store adds free shipping to its “Domestic” zone, configured to require a minimum order of $75. Below $75, customers see only the flat rate. Once the cart total reaches $75, “Free Shipping” appears as an additional option. This structure incentivizes larger orders without requiring custom code — and integrates with the shopping cart and checkout pages automatically.
3. Shipping Classes for Oversized Products
A furniture retailer sells both small accessories and large furniture pieces through WooCommerce. They create a “Furniture” shipping class with a $75 flat rate applied to that class, while standard items ship for $9.99. A customer buying a lamp ($9.99) gets the standard rate; a customer buying a sofa (in the “Furniture” class) gets $75; a customer buying both gets rates combined per the method’s class calculation settings.
Common Mistakes to Avoid
- Not ordering shipping zones correctly — WooCommerce matches customers to zones from the top of the list down. If a broad “United States” zone is listed above a more specific “California” zone, California customers will always match the US zone and never see California-specific options. Order zones from most specific to most general.
- Forgetting the “Rest of the World” fallback zone — If a customer’s address doesn’t match any configured zone, WooCommerce uses the “Rest of the World” default zone. Leaving this unconfigured means international customers see no shipping options — and can’t complete checkout. Always configure this fallback, even if it’s just to show a “Contact us for a shipping quote” message.
- Setting up shipping classes but not assigning them to products — Creating shipping classes in WooCommerce settings doesn’t do anything until you actually assign those classes to individual products in each product’s Shipping tab. This step is easy to skip, resulting in all products using the default (unclassified) rate.
- Overcomplicating the zone structure — More zones don’t always mean better shipping. A complex zone structure with dozens of variations is harder to maintain and debug. Start with the minimum zones that reflect your actual shipping regions, then add complexity only as needed.
Best Practices
1. Map Your Actual Shipping Strategy Before Configuring WooCommerce
Before clicking into WooCommerce settings, document your shipping strategy on paper: which regions do you ship to, what rates apply to each, do product types affect rates, and are there free shipping thresholds? Having this mapped out first makes the WooCommerce configuration straightforward. Trying to figure out your shipping strategy inside the settings interface leads to trial-and-error setup and errors at checkout.
2. Test Checkout With Addresses in Each Zone
After configuring shipping zones, test the checkout flow from customer addresses in each zone — including edge cases like Alaska, international addresses, and addresses near zone boundaries. Use WooCommerce’s built-in “Calculate Shipping” feature on the cart page to verify that the correct rates appear before customers encounter them live. Test with carts containing products from different shipping classes.
3. Review Shipping Configuration After Major Product Changes
When you add new products, introduce a new product line with different size or weight characteristics, or change your fulfillment process, revisit your shipping classes and zone rates. Shipping configuration that was accurate six months ago may no longer reflect your actual costs if your product catalog has changed. Regular review prevents shipping rates from becoming a source of order fulfillment friction.
Frequently Asked Questions
Can a product have more than one shipping class?
No — each product can be assigned only one shipping class. If a product has characteristics that span multiple classes (e.g., it’s both heavy and fragile), choose the class that best reflects the dominant shipping cost driver, or create a new combined class for that product type.
How does WooCommerce handle carts with products from multiple shipping classes?
When a cart contains products from different shipping classes, WooCommerce applies rates based on the calculation method you’ve configured for your shipping methods: “Per class: charge shipping for each class separately,” “Per order: use the highest class rate only,” or “Per order: use the largest rate.” Choose the method that best reflects your actual shipping cost structure.
What’s the difference between a shipping zone and a shipping method?
A shipping zone defines a geographic area. A shipping method (flat rate, free shipping, local pickup) is assigned to a zone and defines how shipping for that area is calculated and priced. One zone can have multiple shipping methods; one method can be configured differently across multiple zones.
Do I need shipping classes for a simple store?
Not necessarily. If all your products ship at the same rate regardless of size, weight, or type, you don’t need shipping classes. Shipping classes add value when your products have meaningfully different shipping costs that need to be reflected at checkout.
Can I restrict shipping to specific countries?
Yes. Configure a zone that includes only the countries you ship to. Customers from countries not included in any zone (except “Rest of the World”) will only see options from the Rest of the World zone — which you can configure to show no shipping methods, effectively preventing checkout from those locations.
Related Glossary Terms
How CyberOptik Can Help
WooCommerce shipping configuration is part of every e-commerce store build and optimization we work on. Whether you’re setting up a new store with complex international shipping requirements or troubleshooting rates that aren’t appearing correctly at checkout, our team can configure your shipping zones and classes to reflect exactly how your business ships. Contact us to discuss your eCommerce project or explore our eCommerce services.