 Problem Solving
 Problem Solving
- Does my website use cookies?
- Email Account vs Email Forwarder
- How to Add a Delegate User on Squarespace Domains
- How To Assign A Technical Contact in Network Solutions
- How to clear the cache in Chrome
- How to clear the cache in Edge
- How to clear the cache in Firefox
- How to clear the cache in Opera
- How to clear the cache in Safari
- How to Clear Your Browser Cache
- How to Delegate Access to Your GoDaddy Account
- How to Delegate Domain Access on Namecheap
- How to spot phishing attempts
- How To View Your Website Traffic/Analytics
- I’m not receiving form notifications from my website
- My changes aren’t showing up on my website
- My image looks blurry after I upload it?
- My site shows a security/SSL warning
- What to Include When Contacting our Helpdesk
- Why doesn’t Google show my meta description or title?
Digital Marketing
- How to Add Google Analytics to WordPress
- How to Claim Your Business Profile on Google
- Technical SEO Explained Simply
Website Reports
- How to Read Your Monthly Website Care Report
- Understanding Google Search Console Metrics in Your Report
- Understanding Website Email Delivery Reports
- What the Security Status in Your Monthly Report Means
- What to Do If Your Monthly Report Shows an Issue
- Why Blocked Traffic Does Not Mean Your Website Was Hacked
WordPress
- Check Your PHP Version in WordPress
- Discourage search engines from indexing this site
- How do I add a new WordPress admin user? Or remove one?
- How do I add HTML code to my website?
- How do I change who a form gets sent to?
- How do I edit my WordPress header or footer?
- How do I redirect a page or post?
- How do I replace an existing PDF or image in WordPress?
- How do I set up a staging website?
- How to Edit WordPress Navigation Menu/Links
- How To Improve WordPress Search
- How to know and what to do if my WordPress website gets hacked?
- How to test changes without messing up a live web page
- Should I run a WordPress security plugin?
- Should I upload videos directly to my website?
- What Is Xmlrpc.php in WordPress? Why disable it?
- What premium plugins/services do I get with your service?
- Where can I find images to use on my website?
- Why are there plugin updates in my WordPress Dashboard?
My image looks blurry after I upload it?
Table of contents
- Why do my images look blurry when uploaded to my website?
- How to fix blurry images in WordPress
If you have a photo that looks great when you look at it on your computer, but it looks distorted/blurry after uploading it to your WordPress website, there are a few simple solutions.
Image Optimization
Here at CyberOptik, included with your service, we use a plugin called ShortPixel to help auto-optimize any photo uploaded on your website.
This plugin gives you three ways to optimize images: Lossy, Glossy, Lossless
We use Glossy by default, which gives you good image quality and only trims the file size a bit.
If you’d like, you can play around with Lossy or Lossless compression methods.
Lossy is going to give you the smallest image file sizes, but will also distort the image the most.
Lossless gives you absolutely no loss in image quality but also keeps the image size the largest.
How To Re-Optimize Your Image Within ShortPixel
If your image has already been optimized with ShortPixel, after you uploaded it to your site, you do have an option to re-optimize it or restore the original. This is useful for seeing if a better version can be made, or if you simply want to skip optimizing the image altogether.
To do this:
- Head over to the “Media” tab in your WordPress admin

- Make sure you’re on the “list” view

- In the far right column, for any image that has been optimized, you’ll see a menu link, click it

- This gives you the option to:
A. Compare – this is going to let you slide to see an overlay of the original + optimized versions of the photo
B. Re-optimize in the two other methods – in this case, it shows lossless and lossy, since the photo was optimized in glossy
C. Restore backup – this will get rid of the optimized version of the photo and restore the original version you uploaded

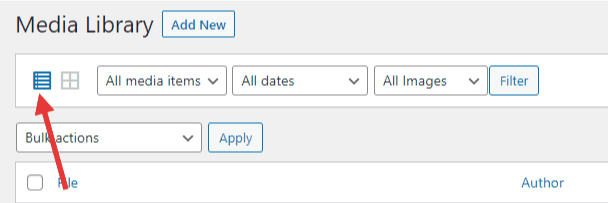
Image Resizing
If your image has text within it, this could also be the cause. When you create an image at one size, with text in it, and then you shrink that down, it’s common for the text to become blurry or illegible. This can happen whether you’re also optimizing the image or not.
The solution? Create the image, with the text in it, at the exact size it’s going to be used on the website. So if the area where your image is going to be is 200×200, create the image at that exact size. Don’t create it at 400×400 and let it get auto-resized.

